Malleable iron is cast as white iron, the structure being a metastable carbide in a pearlitic matrix. An annealing process transforms the brittle structure of the first cast into malleable form.
The main application is the pipeline system, which plays the connection role. The application range is extensive.
So, as a purchaser, how can we check the quality of malleable iron pipe fittings after the order is completed? Moreover, how can we ensure that we purchase high-quality malleable iron pipe fittings?
Next, let us sort it out. Obtain the following inspection guide for malleable pipe fittings.
Part 1: Preparation Before The Inspection
This part consists of both manufacturers and buyers.
Participants:
The main person in charge of the manufacturer, such as salesperson A;
The person in charge of the buyer’s inspection, such as inspector B.

Manufacturer: Salesperson A

Buyer: Inspector B
Inspection time: 3-4 days before loading, we can come to inspect the goods.
Inspection site: Prepared by the manufacturer, the inspection site must facilitate the dismantling and inspection of the goods as well as their positioning.
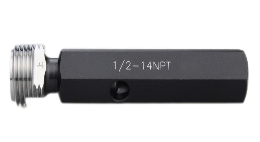
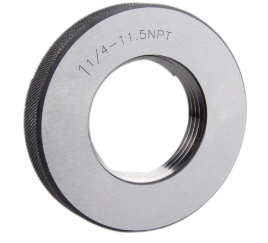
Inspection tools: Plug Gauge and Ring Gauge.

Plug Gauge

Ring Gauge
Quality inspection, production, and warehouse are the central departments involved in the inspection process.
Self-inspection report of the manufacturer: Sampling shall be carried out according to a percentage of not less than 5% of the product and not less than 20% of the total order category. Furthermore, provide an inspection report.
At the same time, if any other part is required in the inspection process, the business person must communicate on time. He must give the customer an answer on the spot.
Part 2: On-site Inspection
Step 1: Gage Verification
If the buyer’s inspection personnel bring their own inspection tools, they should first check with the production factory’s inspection tools. There may be differences in the inspection measuring tools, in which case each party needs to identify the possible inspection standards accepted by both parties.
Step 2: Start Inspection
Must Checked Items.
First: Packaging Inspection
1) Packaging (internal and external packaging): whether it is clean and complete.
2) Labels: Compare with the regulations to see if they are consistent.
3) Pallet: It is necessary to take a picture of the complete, packaged pallet to check whether the pallet is firm. Make sure the number of pallets is correct.
Second: Product Appearance Inspection
1) Appearance inspection of malleable iron pipe fittings: no through holes or trachoma; no casting block on the surface; uniform zinc layer, no large zinc tumour; no leakage plating of galvanized parts; overall smooth and tidy pipe fittings, no noticeable bulge and dislocation.
2) Outer diameter inspection of malleable iron pipe fittings: According to the standard stipulated in the sales contract, measure the outer diameter and register it. Moreover, the error size cannot exceed the production standard specified in the contract.
3) Length inspection of malleable iron pipe fittings: Measure the length of the product according to the measurement method specified in the production standard.
4) Wall thickness inspection of malleable iron pipe fittings: take the wall thickness of the middle section of the pipe fittings as the benchmark, measure three times, and take the average.
5) Thread inspection of malleable iron pipe fittings (ring gauge inspection):
① Plug gauge for internal thread and ring gauge for external thread.
Different ring gauges are used for NPT, BSPT and G threads.
The threads of the pipe fittings should be smooth and not stuck.
② Internal and external threads,
The construction support standard requires the internal and external threads of the pipe fittings, and the thread is at the base surface of the ring gauge, ±1/4 buckle.
③ Thread appearance inspection
The threads of the pipe fittings must not have broken teeth, and the external threads must not have bumps.
④Pipe fittings must have chamfers, and the chamfer deviation should be within a reasonable range.
Sampling Checked Items.
① Thread axis angle: measure 180°, 90° and 45°, the error range is ±0.5°
② Airtightness: 4-5 samples of each size are sampled and sent to the designated inspection site to test the airtightness. If the pipe fittings are infiltrated into the water with an air pressure of 0.7 MPa and no bubbles are seen, it means that the product is qualified.
③ Thickness of zinc layer: Measure the thickness of the zinc layer on the surface of the pipe fittings with a zinc layer side thickness gauge, and randomly inspect 3-5 hot-dip galvanized products. The measurement points of each product are not less than 10, report the number separately, and take the average value as standard zinc layer thickness. The average thickness of the zinc layer shall not be less than 70μm, of which the minimum thickness of the zinc layer shall not be less than 63μm.
④ Zinc layer peeling: Intrude the pipe into the copper sulfate solution to check the zinc layer peeling.
⑤ Mechanical properties experiment: place the test bar on the universal servo-hydraulic press to measure the mechanical properties, tensile strength and elongation rate. Tensile strength ≥350Mpa, elongation ≥10%.
If the customer has unique requirements, the flattening test of the finished pipe fittings can be carried out. This will prove the high quality of the product and the high elongation rate. (The flattening test of finished pipe fittings can only test the deformation rate)
Inspection Summary
According to the above inspection links, make a reasonable inspection record, as shown in the following figure:

Click Here To Download <Inspection Report..xlsx>
Record the number of qualified products and the number of defective products, and calculate the proportion of defective products. Decide whether to accept, return for repair or reject that batch of fittings.
Return For Repair
All the malleable iron pipe fittings of Jianzhi Casting Group can be traced back to the corresponding production workshop, and the production workshop is responsible for repair or replacement.
After completion, the quality inspection personnel will conduct a re-inspection, and the packaging can only be carried out after the re-inspection is qualified.
An Inspection Report Is signed And Stamped
Both sides of the inspection shall sign and seal the inspection report. Ready to ship.
